User Accounts
Administration of user accounts, access rights and passwords. When the System - User Accounts… command or  icon is invoked, the User Accounts dialog will appear. Such dialog is used to define all users working with the station and to set their access rights. User accounts settings are saved in the clarity.psw file.

User Accounts
Note:
Setting access rights is used predominantly to prevent intervention by untrained persons. This is not conceived as data protection against theft - such protection would require setting access rights in MS Windows. If any file is modified outside the Clarity station environment, it would be identifiable due to built-in security features.
Provides a complete list of previously defined users. The highlighted user has their details displayed below. Disabled users are listed in the bottom of the list with (disabled) after their name.
Adds a new user with blank User Name, that must be filled in, and with all access rights enabled.
Duplicates the selected user account from the user list. Rights from section Access To and User Access Rights are copied from the original user. User Name is blank and must be filled in manually.
Disables the selected active user account. Disabled user account cannot be used to login anywhere in Clarity. To use disabled account again, it has to be enabled here.
Erases the selected user from the user list. If all users are deleted the station automatically switches to “all users” mode. In such mode the password is no longer required. Once user is deleted and changes are saved this operation cannot be reverted (user must be created manually from scratch).
Caution:
Password Restrictions parameters are common to all users.
Refers to the minimum length of the password entered. A password shorter than the prescribed number of characters will not be accepted.
Refers to the period of a password's validity. After its expiration the user must select a new password.
Alerts the user specified number of days prior to a password’s expiration.
Relates to the period from which an already used password can be used again. The period is calculated from the time of password creation not from its expiration.
The maximum number of failed login attempts allowed. After reaching this limit, user account will be disabled permanently. Exception is an account with the right to access the User Accounts dialog. Such account is locked only temporarily for one hour.
If the user does not show any activity in Windows for the specified time duration, all opened Instruments will be locked. All windows opened on Instruments will be hidden and the user has to unlock the Instruments upon return.
Caution:
When an Instrument is Auto Locked, all unsaved changes in modal dialogs (Method Setup, Single Analysis, Report Setup, etc.) are discarded and those dialogs are closed.
The fields displayed in the lower part of the window always relate to the selected user in the User List.
User name is used to login to different parts of Clarity. User name will be automatically placed in all headers of files that are created while working with the station. The user name will be displayed along with the Created by or Analyst phrase when a file is selected. It is compulsory for a user to fill in this field and forbidden for two users to have the same user name.
Refers to the name of the file (*.dsk) in which the desktop settings are saved. The file contains settings regarding size, location and visibility of the Instrument windows as well as all the amendable Instrument parameters which are not part of system files and user settings (such as toolbar layouts, custom calculations etc.). If this field is left empty, it will be filled in automatically according to the User Name field.
This setting is common to all Instruments available for the user.
Note:
If you wish to share the same settings for several users, you can link them to the same desktop file. To do so, simply fill in the name of the user with desired settings.
Provides a user’s detailed description.
Note:
User Name and Description are part of signature during electronic signing.
Defines which Instruments the user may access within a station.
A user with access to user accounts can add, disable, delete or change the access rights of other users. A selected checkbox is essentially equivalent to allocating administrator rights. It also allows the user to use the System - GLP Options… command to change the rules for files overwrite. User without such rights can't even open the User Accounts dialog.
Checking this field allows specific user to access following dialogs: System Configuration, Units Setup, Instrument Directories for Projects and Digital Outputs.
Enables the user to create, delete or edit a method. A user with no rights to edit method still can Send Method to Instrument.
Enables the user to edit chromatograms.
Enables the user to create and edit calibrations.
Enables the user to switch among all available projects directly from the Instrument window without need to perform log-off and log-in steps. When enabled the respective user will have access to Project Setup Dialog from Instrument window. When disabled the user will still posses an option to switch to any different project via Login Dialog. This item does not control privilege for creation of new project or assignment of project to respective Clarity users at all.
Note:
It is not possible to prevent any Clarity user from creating new project via Login Dialog and Project Setup Dialog.
Enables the user to import chromatograms.
Take Control of Locked Instrument
Enables the user to take control of an Instrument that has been locked by another user. The Instrument can be locked either using the Auto Lock or by the Instrument - Lock Instrument X command in the Main or Instrument window. All actions will be logged into Audit Trails under the newly logged user. If the new user does not have the Start Acquisition rights, the running analysis or sequence will be finished but the next analysis will not be started.
Caution:
All unsaved changes in files made by the previous user will be discarded.
Note:
It is recommended to set one common Desktop File for all users with this option enabled. Otherwise the desktop of the first logged user will be used for all users that take control over the Instrument, until the Instrument is closed again. It is also recommended to set the same Edit... rights for users that plan to take over Instruments (other rights might differ between the users).
Enables the user to create and edit sequences.
Enables the user to create and edit report styles.
Enables the user to select a method for Single Analysis. This feature does not apply to Sequence and Batch.
Note:
To disable it in sequence, please refer to Edit Sequence.
Enables access to all Audit Trail (e.g., Station, Chromatogram Audit Trail) dialogs to view the audit trails.
Enables access to the Audit Trail settings dialog.
Enables access to Backup accessible via Instrument - Archive/Restore commands.
Enables the user to change the post run settings in theSingle Analysis - Post-run Options tab, Sequence window and the Batch dialog. Option does not prevent user from performing those actions.
Permits the user to start the sequence or single analysis. This right also allows the user to use Skip Vial and Repeat Injection commands.
Notifies whether a user has already selected a password or not. Possible conditions are either Submitted (password already entered) or Blank (password not entered yet).
Date of last password change.
Date of last login.
Changes password. After the prompt a New Password dialog appears. Here you may enter a new password.
Sets a certificate which will be available as a default option while using the electronic signature - the Sign function in the Chromatogram window. Different certificate can be selected manually during the signing process, selecting certificate here just preselects it in the Sign dialog to minimize manual actions needed. If certificate is not selected, the No certificates assigned to the selected user note is shown.
Note:
More information on working with certificates and electronic signatures can be found in manual M132 Clarity in Regulated Environment, chapter 3.9 Electronic Signatures, accessible on DataApex website in the Documentation - Manuals section of the Download page.
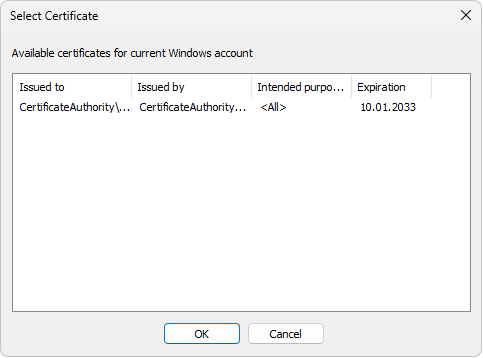
Select Certificate
In the Select Certificate dialog one of the certificates installed on computer can be selected.
Cancels the assigned certificate.
Note:
DataApex does not issue certificates nor can mediate their purchase. Certificates are issued by independent companies.