Single Analysis
Prepares and runs a single analysis. Invoking this command opens the Single Analysis dialog, which can also be opened using the  icon in the
Note:
If the Analysis tab contains other fields than described here, then you are probably using one of the Extensions (such as GPC or EA), refer to the corresponding manual.
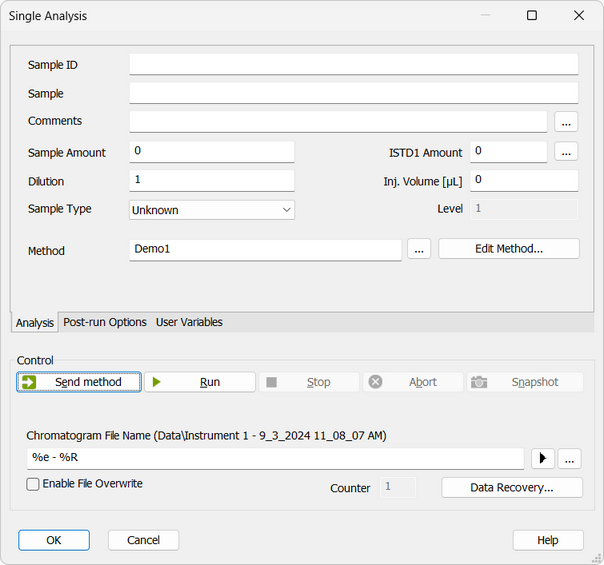
Single Analysis - Analysis tab
Comprises the description and parameters of single analysis. All entered values will be transferred to the chromatogram header after completion of the analysis.
Sample identification field used for information purposes only. Maximum number of characters in this field is limited to 64. Variables that can be used are described in the Chromatogram File Name field (for more details see also chapter Chromatogram File Name)
Sample description used for information purposes only. Maximum number of characters in this field is limited to 64. Variables that can be used are described in the Chromatogram File Name field (for more details see also chapter Chromatogram File Name)
Serves for adding some information about the chromatogram created by current method. Comments can be edited in the Comments dialog accessible through the  button.
Sample amount. The value is used in calibration calculations of individual components percentage in the ESTD and ISTD methods. In ISTD enter the sample amount without the addition. Enter values using the same units that were used in the calibration file (Units - Compound parameter in Calibration Options window). The default value is 0.
An added amount of the internal standards for the ISTD method - the amount of the ISTD1 can be directly edited in the Single Analysis dialog, the amounts for ISTD2 - ISTD10 can be set using the Edit ISTD Amounts dialog accessible through the button next to it. Always state this parameter in the same units that are used in the calibration file (Units - Compound parameter in Calibration Options window). The default value is 0.
A sample dilution factor. This value is used to multiply each calibrated amount in the Amount column of the Result Table. Dilution factor is the total number of unit volumes in which the sample was dissolved. In other words, dilution represents the total volume of solute + solvent. The default value is 1.
An injected volume of the sample. The responses of all compounds will be corrected by the ratio of this value and the Default Injected Volume parameter from the calibration file in recalibration or calibration calculations. The default value is 0. The units are set in the Instrument Units dialog (described in the chapter "Right section of System Configuration dialog").
Sets the type of the sample being measured. This option cannot be changed during running analysis. Possible options are:
Unknown - denotes an unknown sample and resulting chromatograms will be stored in the data sub-directory.
Standard - measured chromatogram will be used to create a calibration which needs to be specified (Calibration File) in the method on the Calculation tab. Resulting chromatograms will be stored in the calibration sub-directory.
Blank - in fact a calibration standard with no amount of added sample. The Blank is thus one point of a calibration curve (with the Amount of 0). Calibration file needs to be specified (Calibration File) in the method on the Calculation tab.
Sets the calibration level for calibration or recalibration. This field is active only when Standard option is selected.
Displays method which will be used to acquire chromatogram. Name of existing method can be directly inserted into the row or it can be chosen via the button. To view or edit method which is displayed, simply press the Edit Method... button which will open corresponding method in the Method Setup dialog. During a running analysis another method may still be opened (will not be sent) in the Method Setup.
Section with commands and parameters for controlling an analysis.
Sends method, that is displayed in the Method row, parameters to controlled modules, regardless on the setting of the LC/GC/AS method.
Note:
The Send Method button is visible only when the instrument is configured with a control module.
Runs an analysis. Analysis in progress is indicated by the inscription RUNNING in the Status Line below the  icon. The parameters of the current measurement method in the Method Setup - Acquisition dialog cannot be changed while an analysis is in progress.
Invoking Run command during analysis is possible only when External Start setting in Method Setup - Measurement dialog is set to Start-Restart. Clicking the command terminates running analysis and at the same time starts another one - this operation procedure is often called continuous measurement.
If you enter the Chromatogram File Name including a subfolder, for example %B_%Y\%e - %R\%e - %R, then the Clarity - Directories dialog will be displayed.
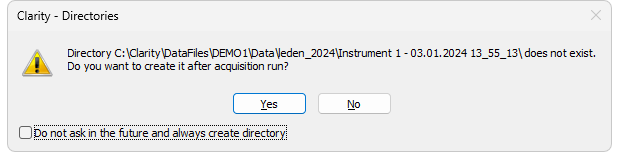
Clarity - Directories dialog when the subdirectory doesn't exist
Click Yes if you want to allow Clarity to create the subfolder after the acquisition is finished. If you press No, then you must delete the directory and the backslash from the Chromatogram File Name. In the dialog you can see that it is also possible to use the parameters in the subfolder name as in the chromatogram name.
Note:
Invoking the command during analysis is possible only when there are only analog detectors (INT7, Net-PAD,…) configured on Instrument. If there is one or more digital detectors on Instrument, invoking the command during analysis is not possible.
Terminates the running analysis and processes the results - a chromatogram is created with the name entered in the Chromatogram File Name field. The method used in its processing is the measurement method (its name is found in the Information Table). Events following the completion of an analysis are specified by items from the Single Analysis - Post Run Settings tab. The Instrument returns to the STOP or WAITING state. While the program controlling the chromatograph is running, CONTROL is displayed.
Aborts an analysis without storing or processing the data. The instrument will return to either the STOP or WAITING state, the chromatograph controlling program, if any, is aborted.
Processes the existing part of the analysis without its termination. A chromatogram is created using the name specified in Chromatogram File Name field. The processing mode is the same as with the Stop command, the Instrument, however, remains RUNNING. If you are about to replace an already existing file, you will receive a warning, but only upon the first use.
This checkbox enables to perform injection using directly controlled autosampler. Once checked, this option renames Run button to Inject & Run. Incorrect Inj. Volume will prevent you from starting the acquisition. The checkbox will remain checked until the user unchecks it again.
Note:
Only an autosampler configured in the System Configuration can be used to perform the injection. If an autosampler is not configured, option to Use Autosampler will be hidden and thus not possible to use.
Specifies vial number from which one injection will be performed. Incorrect vial number triggers an error and must be solved otherwise it is not possible to perform an injection. Autosamplers supporting graphical interface for inserting vial number, display - clicking this button invokes Select Vial dialog for selecting a vial.
Sample name for created chromatograms. The name can be composed of fixed expressions, as well as variable parameters (e.g. adding time, date and/or sample ID and many other parameters). Fixed part may be combined with the variable part in a single chromatogram name.
Chromatogram File Name is checked for correctness of the name. Upon clicking the Run button, invalid name triggers a message with a description of the problem.
After clicking the  button a list of available parameters and a brief description of their functions is displayed. You may stepwise compose the title of the file by selecting the required variables (for more details see also chapter Chromatogram File Name)
It is possible to include also the name of a subfolder in the name to store chromatograms into subfolders of the Data Subdirectory. E.g. the MySubProject\MyFileName in the DEMO1 project will result in the MyFilename.prm stored in the C:\CLARITY\DataFiles\DEMO1\DATA\MySubproject folder. If the subfolder doesn't exist, then it will be created when the chromatogram is stored.
Note:
Chromatogram File Name field content can be changed when the analysis is running and will influence the name of its resulting chromatogram, when the change is accepted by pressing the OK button afterwards.
Selects a chromatogram location that is different from the current project. After clicking on this button the Save As dialog will appear. Here you may select a folder for saving the chromatogram.
Note:
It is not particularly suitable to save chromatograms outside of their project folder.
This button is most often used for determining the titles of previously existing files in the folder and helps to avoid the use of identical titles. It is also possible to create a new file on the basis of an already existing title.
Enables the overwrite of existing chromatograms without giving notice. It is necessary to close the Single Analysis dialog and open it again for this setting to take effect.
In case the file overwriting is not allowed and the chromatogram with the same name already exists, a chromatogram with the same name and suffix _001.PRM is created instead. The number of such suffix is then incremented in case the necessary file name is already taken. This is applied when an acquisition is restarted and following conditions are set in the method: External Start/Stop is chosen and Start - Restart mode is selected.
Shows the current value of the sample counter. If automatic numbering is used for naming chromatograms in the %n format, the current value may be changed here.
Rescues data from an interrupted analysis. If an analysis has been interrupted for any reason (power failure, computer breakdown, invocation of the Abort command, etc.) a portion of the measured chromatogram may still be rescued.
Invoking the command opens the Rescue Data dialog where you select from the *LAST.RAW and *RUN.RAW files. If no data can be rescued, the items will be dimmed.
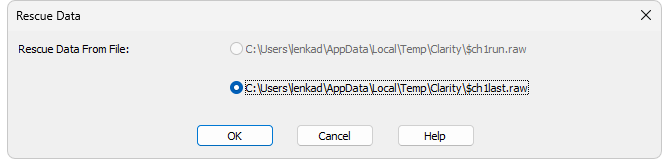
The *LAST.RAW and *RUN.RAW files are stored in the Temp subdirectory located on local disk in Windows User's account directory (C:\USERS\<user name>\AppData\Local\Temp\Clarity by default).
Note:
The AppData folder is hidden in Windows by default.
The *RUN.RAW file will be created only when Clarity station has crashed while measuring data (e.g. after a power failure). Otherwise the last measured chromatogram will always be saved to the *LAST.RAW file.
Pressing the OK button invokes the Save As dialog.
During a running analysis data are saved to the hard disk with various period and duration of this period is dependent on used instrumentation (detector).