The method essentially contains information on how the analysis will be performed, how the resulting signal will be processed and what events will be triggered and when.
Any method can be created or edited in the Method Setup window. To use the method for measurement it has to be sent to the instrument and for sequence measurement method has to be set at each row.
Method vs. Chromatogram Method
- The sent method specifies the acquisition and processing parameters of created chromatograms and its content is saved to the chromatogram file as "chromatogram method". Processing part of the method can be edited in the chromatogram after the measurement, the acquisition is available as read-only.
- The changes made in the chromatogram do not affect the method file.
- The calibration file is linked to the method and to the chromatogram by its name.
Method Setup window
- The title of the Method Setup dialog displays a name of currently opened method. If you make any changes, the method becomes (MODIFIED).
- The upper part of the Method Setup dialog displays a set of icons with which it's possible to create a new method, open existing method, save method, save method as, open Report Setup, open method audit trail, send method by e-mail or open help.
- Upon pressing the OK button, method will be saved and Method Setup dialog will close.
- Tabs shown in Method Setup window are dependent on devices actually configured on the Instrument, e.g. MS Method, PDA Method, LC Gradient can be only visible when proper instrument type and devices are set.
Send Method
- Only a method that is saved can be sent.
- Pressing the Send Method button will result in two actions:
- Method will be sent to all connected hardware and thus displayed in the information table of the Instrument window.
- Method will be set as method for Single Analysis - you can start the single analysis form the instrument window using the
 icon.
icon.
- When measuring sequence, each row can have different method. It is set while creating or editing the sequence tab in the Method Name column.
Method Development
Method currently used for acquisition or present on already locked row of the sequence can't be edited, but can be viewed in read-only mode.
When developing a method, you can configure the following settings among others:
- Set the measurement conditions.
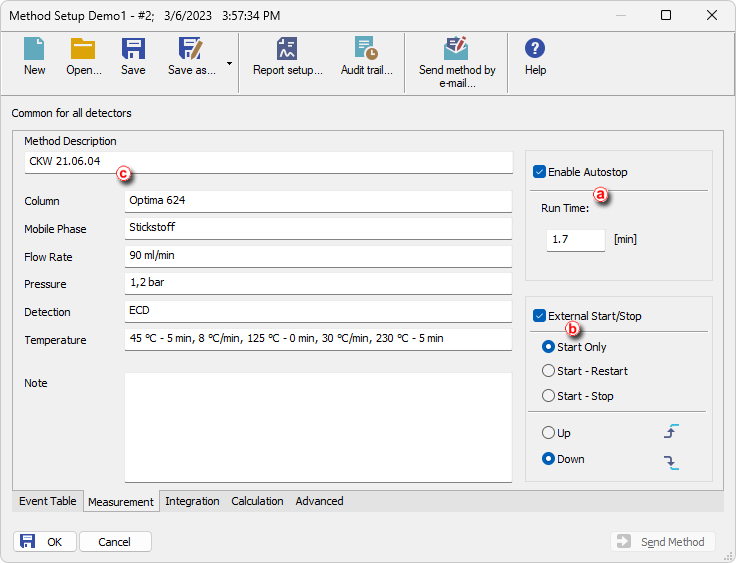
Here you can disable or enable Autostop and set the run time for the analysis ⓐ as well as configure the external signal start and stop settings ⓑ (default setting Start Only should be used in majority of applications). Autostop can be set within interval 0.2 - 9999 min, such value is not influenced and does not influence any device specific time program settings on different tabs (like LC Gradient or GC). When time defined in Autostop passes, acquisition is finished, chromatogram is created, remaining time from time programs will be spent in so-called Control state.
You can also describe some parameters of the method and add a note ⓒ. Such information is purely informative and do not influence analysis in any way. They are saved into the resulting chromatogram.
- Set the Data Acquisition parameters.
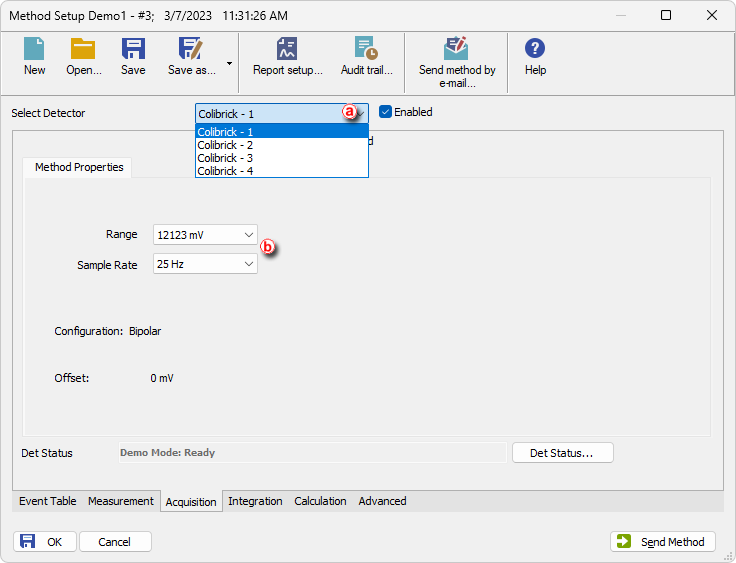
It allows you to select, enable/disable the detector signals ⓐ and to set measurement parameters e.g., the signal range and sample rate ⓑ. At any time at least one detector has to be Enabled.
Layout of this tab, together with possible parameters to be set, are dependent on the configured devices (control modules) on the Instrument.
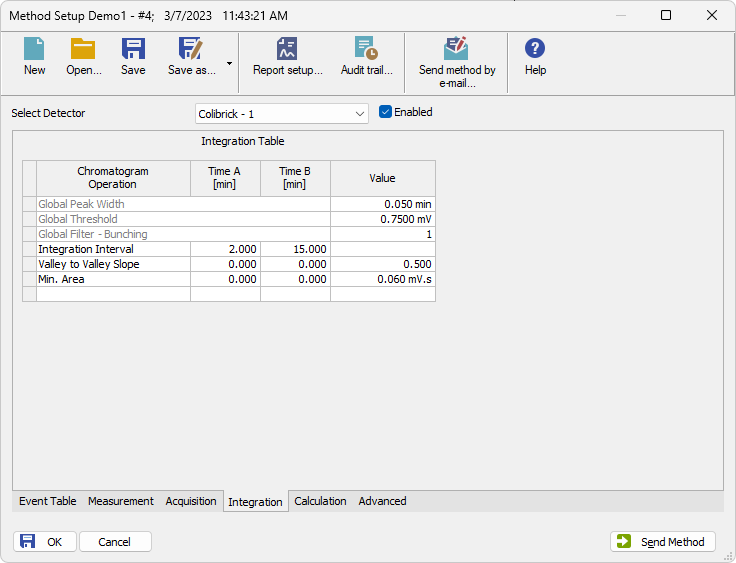
- Set the Signal Integration parameters.
When using a multi-detector configuration, there is an integration table for each signal, thus every signal can be integrated in a different way.
Every resulting chromatogram acquired with such method will be integrated automatically accordingly the integration tab.
If you aren’t able to edit tab parameters the current detector, it probably isn’t Enabled.
Note:
Integration parameters are often modified manually after the first acquired chromatogram directly in the Chromatogram window. Then you can manually rewrite them into any method in the Method Setup dialog or you can use the Method - Save as Method menu command in the Chromatogram window to easily copy them into your method. For more details see also chapter Saving the chromatogram method as a method file.
- Set the calculation options.
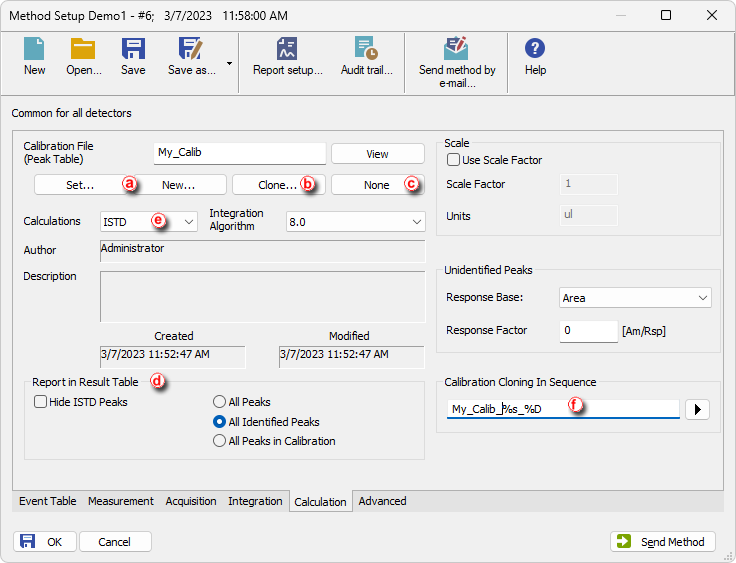
- You can create New... calibration file or Set... the one created previously ⓐ and configure the different settings related to it.
- When calibration file is set, resulting chromatograms will be calibrated according to it and calibration standards will be used to automatically re-calibrate the attached calibration file.
- Clone... ⓑ button will create a copy of a current calibration file. In the following Save As dialog you can select the name and location of the new calibration file. The copy will then be linked to the method.
- If it is desired to have no calibration in the method you can use the None button ⓒ.
- In this tab you can also choose how you want the results to appear in the results ⓓ and set calculation type ⓔ .
- Name of calibration clone ⓕ must be set here to use calibration cloning in sequences, refer to chapter Calibrating using clone on first recalibration.
- Configure the settings in the additional tabs.
Method Setup also has tabs specific to currently configured devices, Advanced tab, Aux. Devices tab, Aux. Signals tab (where you can set which signal should be stored) and Event Table tab used for configuring what events will be triggered and when e.g. shutting down Clarity after the sequence is finished.
However, there are some limitations of Event Table:
- It is for specific purposes, not needed for standard analyses.
- Does not have control against infinite loops.
- Must be filled per row, Fill Down/Fill Series can't be used here.
Note:
For more information on any of the settings above, press F1 in such Clarity window to go the corresponding section of the Help or use the Clarity Reference Guide.