Bracketing is a direct calibration method used to compensate for the variation in instrument response with time. Typical use is for detector response deteriorating or sample containing compounds staining or interacting with the column. Bracketing is not helpful for random variations. Bracketing may be in place when 2 calibration curves measured on the same series of standards have a stable trend and good correlation, but they are not the same.
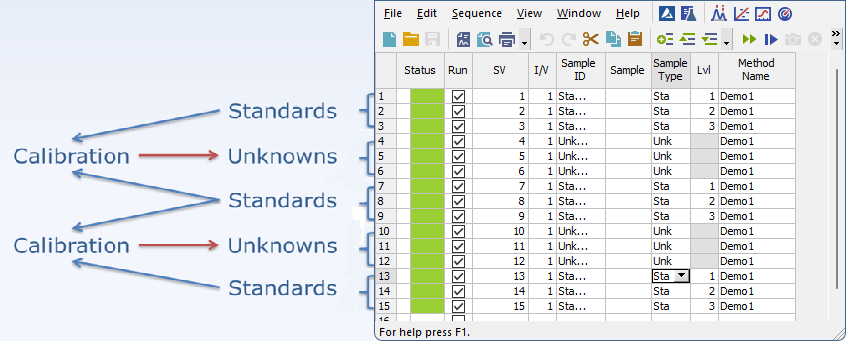
To use bracketing in sequence, the order of the rows must be standards, then unknowns, then standards again. Usually, two standards are used; more standards could be used if the measuring instrument has a non-linear response. Samples are evaluated by a calibration which is created by averaging the standards before and after the unknown. As every unknown sample series is demarcated by calibration standards it uses a single calibration. Calibration will be cloned from the previous calibration clone whenever an unknown sample or blank follows the calibration standard. The newly cloned calibration file has all responses cleared - apart from the responses from the last series of calibration standards (immediately preceding the current unknown samples).

- Open the method that will be used in the sequence: click File - Open Method… from the Instrument window.
- Navigate to Calculation tab.
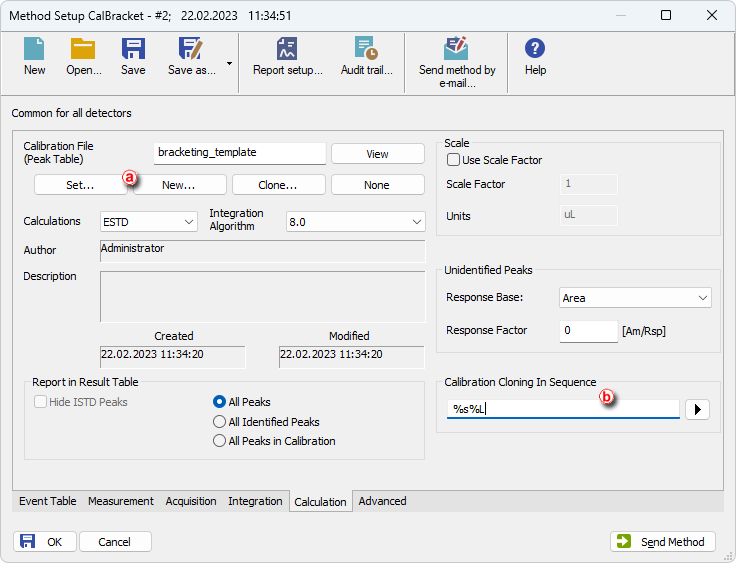
- Set the template calibration as Calibration File: click Set... ⓐ and select the calibration. Note that this calibration will remain unchanged, newly created clone of the calibration will be used with new responses.
- Set the name of the cloned calibration: set the name in Calibration Cloning In Sequence ⓑ. You can use predefined parameters (refer to Creating customized file names automatically).
- Click OK and save the modified method.
- Open Calibration window and the template calibration: click Window - Calibration from the Instrument window and File - Open... in the Calibration window, select the template calibration (in this case bracketing_template.cal).
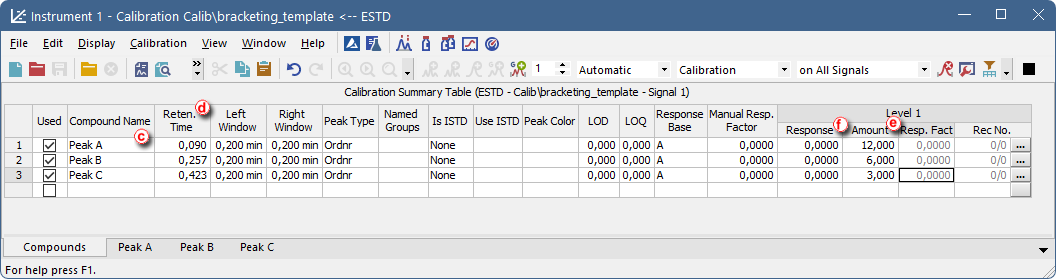
- Set Compound Names ⓒ, Retention Time ⓓ, Amounts ⓔ, etc., but no Responses ⓕ (you can use previously measured standard to get the Retention Times).
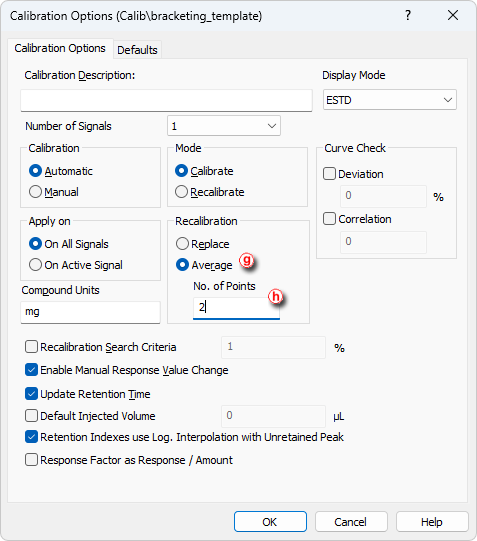
- Update Calibration Options: Set Recalibration to Averageⓖ and No. of Points to 2ⓗ (no more points needed as they would not be applied anyway).
- Save changes and close the calibration.
- Open Sequence window and create a new sequence: click Analysis - Sequence and then
 icon.
icon. - Set the sequence according to the following steps: (for more details about creating the sequence refer to Creating and running a sequence)
- Set the row/s for the standard/s. ⓘ
- Add a row for a blank, if you wish to.
- Set the row/s for the unknown samples.
- Repeat the row/s for the standard/s.
- Repeat the previous four steps for every "bracket" of unknown samples you wish to add.
- Set the sequence to operate in the calibration bracketing mode:
- Click
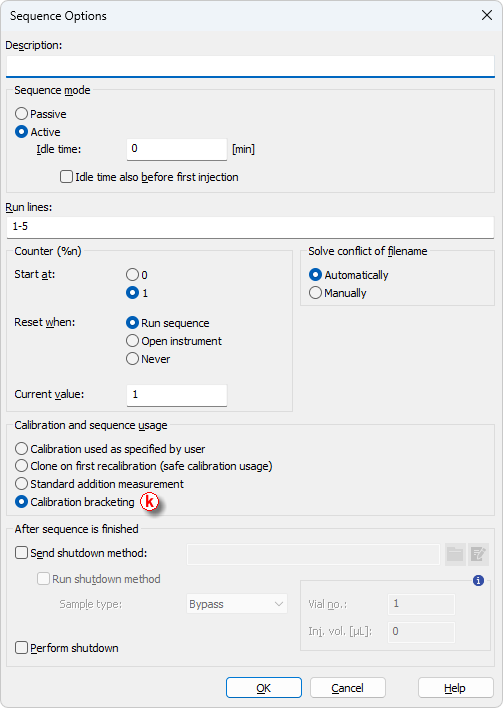
 icon to open the Sequence Options dialog. ⓙ
 - Check Calibration Bracketing. ⓚ
- Click OK.
- Click
Note:
The sequence must start and end with a row with Standard Sample Type.

Note:
If your sequence is using multiple methods, calibration using bracketing is still possible to use but make sure that the Calculation tab is exactly the same for all the methods used in the sequence.
- Run the sequence (for more details about running the sequence refer to Creating and running a sequence) .
- The results shown while the sequence is running are recalculated at the end of each bracket, when the standard after the unknown sample is acquired. The calibration used is an average of the two calibrations, before and after the unknown.
Note:
The measured sequence can be reprocessed using Batch. For more info see the topic Reprocessing whole sequence while using calibration cloning.