SOP - shared desktop file
To set up and secure a shared desktop file, follow these steps:
- Prepare the desktop file so that it meets your requirements for the settings.
- Use the account with Administrator rights to enter the User Accounts dialog.
- In the User List, select each user who should use the shared desktop. For each user selected, change the desktop file name in the Desktop File field to the desired name.
Note:
The file name of the shared desktop corresponds to the file created under the account that prepared it. If the Desktop File field is left empty, Clarity automatically uses the default file, which has the same name as the user account.
- Click OK to confirm the changes and leave the User Accounts dialog.
- Close Clarity.
- Using the file manager, locate the desktop file in the Clarity installation directory (C:\CLARITY\Cfg by default). The file name will match the one specified earlier and will have the .DSK extension.
- Open the file’s Properties, then adjust the security settings so that users have only Read & Execute permissions. This change must be made using an account with Administrator privileges, in the same way as described in the chapter "Computer User Rights"
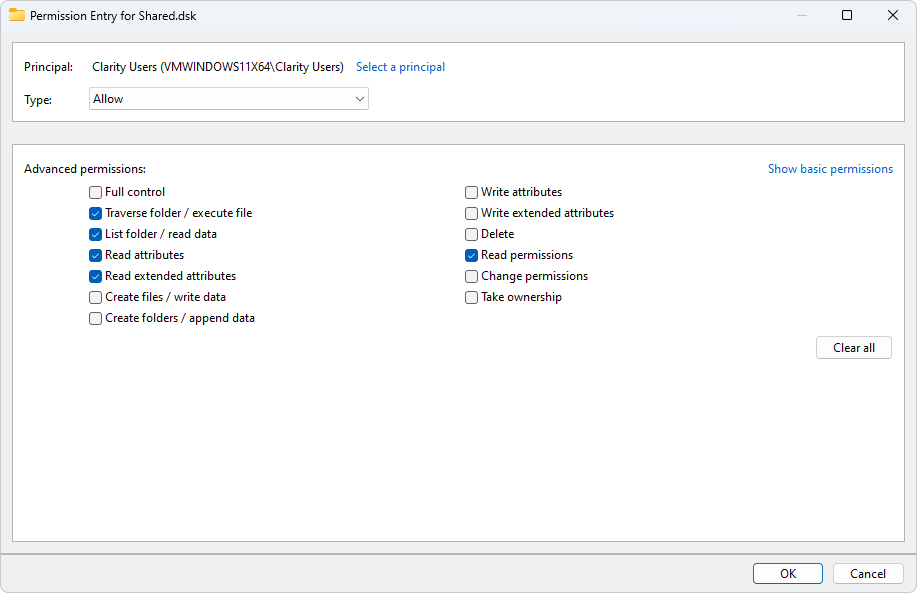
- Go to Advanced Security Settings of the targeted file to change privileges. Use Disable inheritance and select Convert inherited permissions into explicit permissions on this object. Modify the permissions for the selected groups or users so that they can access this file but cannot modify it, as shown in the image below.
- Ensure that the Security Settings for the CFG folder remain identical to those described in the chapter "Computer User Rights"
Note:
Users will be able to modify the shared desktop temporarily while Clarity is open, but they will not be able to save these changes.
- Users that should be able to update the file must keep permissions inherited from the Cfg folder.
Security Settings for Shared Desktop - User Entry - Windows 11