SOP - User Accounts - User account setup
To create a standard User account in Clarity, follow these steps:
- Open the Clarity station.
- In the main Clarity window, use the System – User Accounts... command to enter the User Accounts dialog. Click New to create new user account. Fill in the following fields:
- User Name: Enter the desired user name.
- Desktop File: Specify the desktop file name.
- Description (optional)
Note:
It is recommended to use the user’s full name in the User Name field as it is then displayed in the Audit Trail and in reports, making it easier to identify who performed each action.
- Assign the User Access Rights. Access rights depend on the user’s role and responsibilities. At minimum, the following checkboxes SHOULD NOT be checked for standard users:
- Open User Accounts
- Open Configuration
- Open Audit Trail Settings
- Archive / Restore
- Optional: Set the Certificate to be used for electronic signatures.
Note:
The Archive / Restore rights may be set only to the person responsible for data archiving in the company. All other options listed above should remain restricted to Administrators. It is recommended to leave Archive / Restore privileges to the IT Administrators and/or QA personnel.
- The setting of the User Accounts dialog for the common user may be seen in the picture below:
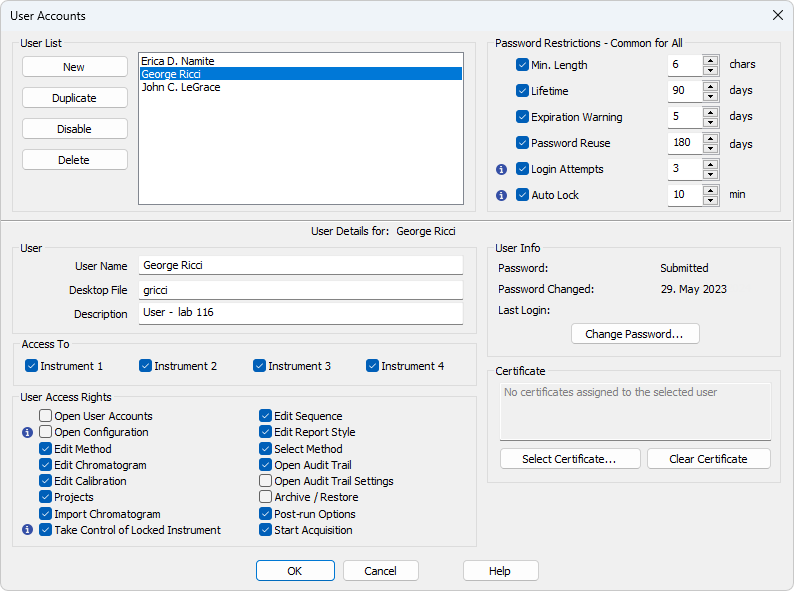
User Accounts - Setting a User account
- Create all required User accounts the same way, then click OK to confirm and save the settings. You can also use the Duplicate function to create additional accounts more quickly with the same access rights.