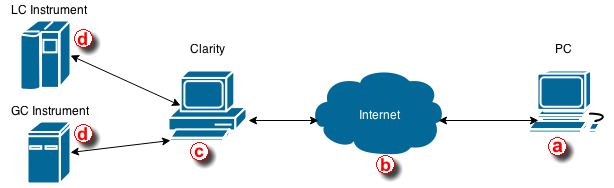
This step by step guide will help you to connect remotely to a PC with Clarity ⓒ installed from your home or office ⓐ. It will allow you to connect remotely to that PC and take control over the whole computer and thus control Clarity and connected instruments. The connection is realized over the internet or a local computer network. Connection over the local computer network is more secure since the transferred data never enter the internet.
Requirements:
- ⓐ PC needs to have Remote Desktop Connection installed
- ⓑ Internet connection or a reliable computer network
- ⓒ PC with Clarity needs to have Remote Desktop Connection installed
- Remote Desktop Connection is a standard application installed in Windows operating systems.
This description is for setting up a remote connection in Windows 11. Dialogs may vary depending upon the Windows version used.
- To allow remote connections on the PC with Clarity ⓒ you want to connect follow the steps below:
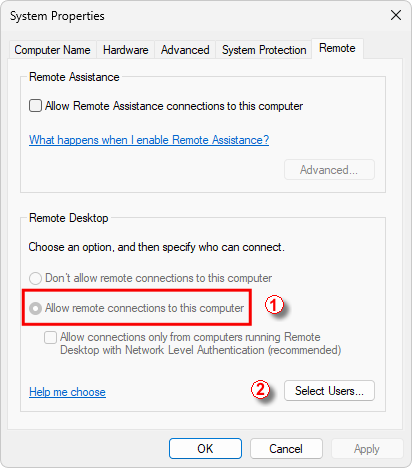
- Go to the Control Panel - System and Security - System - Allow Remote Access.
- If you're prompted for an administrator password or confirmation, type the password or provide confirmation.
- Under Remote Desktop, select one of the three options.
- Click Select Users.
- In the Remote Desktop Users dialog box, click Add.
- In the Select Users or Groups dialog box, do the following:
- To specify the search location, click Locations and then select the location you want to search.
- In Enter the object names to select, type the name of the user that you want to add and then click Check Names. This will check whether the user exists. If not, it will trigger a not found dialog. Check the name once again. Note that this user must have a profile on this computer. If the user name is correct, click OK.
- The name will be displayed in the list of users in the Remote Desktop Users dialog box. Click OK and then click OK again.
- In case Remote Desktop options are grayed out your computer is probably in a domain and due to domain policies you may not be able to change the settings. Contact your network administrator to resolve the situation.
- Look up the name of the remote computer ⓒ. You will to provide this information in step 5.
- Go to System - About.
- There is the Device Name, which is the info you need.
- Alternatively your network administrator might also be able to give you the name of the computer.
- Set a password for your user account on PC with Clarity ⓒ. Your user account must be password protected before you can use Remote Desktop to connect to another computer. Password protection is now default setting in Windows, so you may have that already set up.
- Go to the User Accounts - Sign In Options.
- To allow Remote Desktop connections through a Windows Firewall on the remote PC ⓒ follow the steps below:
If you're having trouble connecting, Remote Desktop connections might be getting blocked by the firewall. Here's how to change that setting on a PC. If you're using another firewall, make sure the port for Remote Desktop (usually 3389) is open.
- Go to the Control Panel.
- Click System and Security.
- Click Allow an app through Windows Firewall under Windows Defender Firewall section.
- Click Change settings and then check the box next to Remote Desktop.
- Click OK to save the changes.
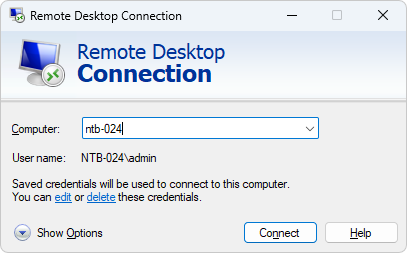
- Start Remote Desktop from the computer you want to work from ⓐ.
- Open Remote Desktop Connection.
- In the Computer box, type the name of the computer that you want to connect to, and then click Connect. (You can also type the IP address instead of the computer name.)
- Note that the remote PC cannot be in sleep mode or hibernating.
- This text has been taken from the How-to: "Connect to another computer using Remote Desktop Connection" created by Microsoft Windows.
Once you successfully connect to the remote PC you can work as if you were sitting in the lab and working with Clarity. The remote desktop will be presented in the normal window. To terminate the session, close the window.
This solution then enables you to:
- Control instruments that are directly connected to Clarity.
- Monitor data acquisition.
- Evaluate chromatograms in Clarity.
- Work on other projects and leave the remote session open and check once in a while if everything is running smoothly.
Possible situations that may arise using the Remote Desktop Connection:
- If you remotely connect to a PC where you are currently logged in, you will be automatically put through and you can start working.
- However, if you try to connect to a PC when there is logged in someone else, e.g. another analyst, he will be asked if he allows the remote connection to put through. If he declines the remote connection you will not be able to connect.
- PC that you are connecting to must be turned on, it is not possible to connect to a PC that is off or in sleep mode.