SOP - the data archiving
It is recommended to use external tool to create regular backup of data and other files. However, entire projects can also be archived directly in Clarity by following these steps:
- A user with Archive/Restore privileges (typically an Administrator or QA personnel) must open Clarity and the Instrument.
- Use the Instrument - Archive... command on the Instrument window to open the Backup dialog.
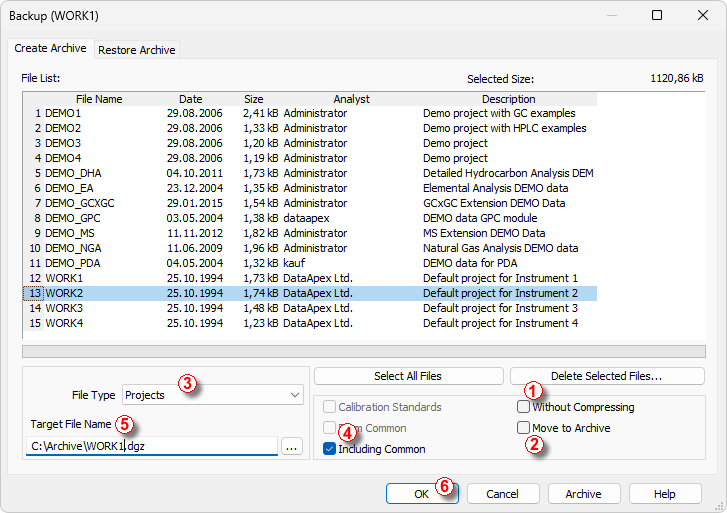
Backup
- Uncheck the Without Compressing checkbox ①.
- If you want to move files to the archive and delete them from their original location, check the Move to Archive checkbox ②.
Caution:
If the Move to Archive ② option is selected, files will be deleted from their source folder. When the DataFiles folder has restricted permissions (as described in the chapter "Computer User Rights"), this operation can only be performed by a user with Full Control privileges - typically a local IT administrator.
- In the File Type field ③, select Projects. The list of available projects will appear in the File List. Select the project you want to archive.
- Optionally, check Include Common to include any files that are stored in DataFiles\Common ④.
- In the Target field ⑤, choose the path and the name of the archived file (*.dgz extension).
Note:
Do not save archive files directly to the root directory of the operating system (typically "C:\"). Due to UAC - User Account Control restriction in Windows 7 and newer, it is safer to create and use a dedicated subfolder instead.
Caution:
It is possible to disable deletion or alteration of created *.dgz archives by adjusting the Security Settings of the Target folder ⑤ . These settings must be configured exactly as described in the chapter "Computer User Rights".
- Click OK ⑥ to archive the project and close the Backup dialog. Alternatively, you can use the Archive button to perform the operation without closing the dialog.
To ensure that the archived data set is complete, also archive the Audit Trail and Configuration files.
Note:
Each data file in Clarity has its own Audit Trail log. Overall events, such as opening the Instruments or actions performed in the Device Monitor, are recorded in the Station Audit Trail.
Archiving Audit Trail Files
- Open the Backup dialog.
- Uncheck the Without Compressing checkbox ①. Unlike the whole projects archiving, the Move to Archive checkbox ② should stay unchecked.
Note:
The daily and station audit trails are common for the entire Clarity station. If multiple instruments are available, deleting these files might also remove log data from other projects.
- In the File Type field ③, select the Audit Trail Files, then choose the appropriate files from the File List.
- Choose the path and the name of the archived file (*.dgz extension) in the Target field ⑤. Be careful not to overwrite an existing project backup.
- Click OK ⑥ to archive and close the dialog, or use Archive to perform the operation without closing the window.
Archiving Configuration Files
Archiving the Clarity configuration file cannot be performed from within the Clarity environment. Although the configuration file is not required for processing further records, it is essential for ensuring the repeatability of measurements.
- A person with Administrator rights on the computer (not in Clarity - typically a company IT worker or laboratory supervisor) must open the file manager while Clarity is closed.
- Navigate to Clarity installation directory (C:\CLARITY by default).
- Locate the configuration file Clarity.cfg (in C:\CLARITY\CFG by default).
- Copy this file to the same location as the other archived files.
It is recommended to also backup any used *.dsk files and clarity.psw in the same manner as the configuration file.