Sequence window
Analysis Procedure: Step 1 -> Step 2 -> Step 3 -> Step 4 -> Step 5
- In the main Clarity window, open the Instrument on which you want to test the functions of Sequence.
- In the displayed Login dialog with the pre-selected Administrator, choose the option DEMO1 in the Select Project: and press the OK button.
- Use the Sequence
 button in the Instrument window to enter the Sequence window.
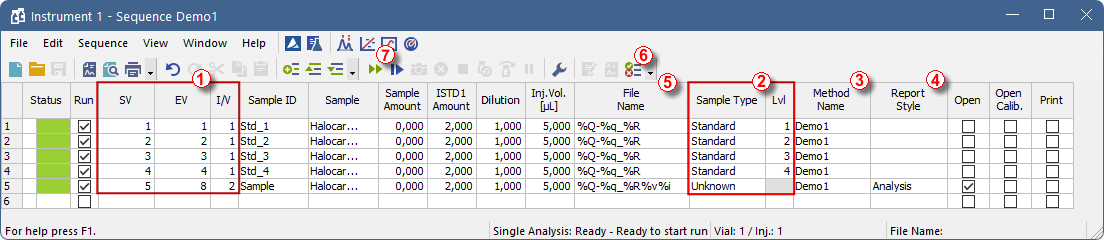
- Look at the Sequence Table. Each row of this table defines one or more analyses, depending on the fields SV (Starting vial), EV (Ending vial) and I/V (Injections per vial) ①. As shown, the first four rows each represent a single measurement (SV and EV is the same, I/V is 1), while row 5 represents eight analyses (SV is 5, EV is 8; thus measuring 4 samples from 4 successive vials and as I/V parameter is 2, each sample will be measured twice).
- Also note that in the fields Sample Type and Lvl ②, the first four samples are marked as standards on levels 1-4. Chromatograms measured from those rows will be automatically used for creating the calibration (or its recalibration, if there had already been some data in the calibration).
- The Method Name column ③ sets the template method used for measuring the sample.
- The Report Style column ④ sets the print style used for measurement reporting . Each row can have its own template method and report style; thus, it is possible to measure according to several template methods within one sequence.
- In the File Name column ⑤
, the name of the resulting chromatogram file is specified. It is possible to use variable parameters to form the chromatogram filename, for example %Q means that the file name will use the text from the Sample field. The complete set of available variables can be listed after clicking in the field and selecting the
 icon. It is possible to combine several of these variables with plain text or symbols to create a unique file name for each chromatogram.
 - To verify the sequence setup, click on the
 icon ⑥. The Clarity station will change all symbols at the beginning of the row to green fields (
 ), meaning the rows are ready, and display an error/warning
 message if a problem is detected. The error/warning message is accompanied with a list of corrections for each case, guiding you on what needs to be fixed before proceeding.
Note:
For demonstration purposes only, try to make a mistake and check the sequence once more. For example, change the text in the Sample column to Std_1in row 3. Immediately, you can seet that a warning sign appeared on the corresponding rows - 1 and 3. After pressing the icon, the warning message appears, informing that there are two rows which would produce chromatogram with the same file name. Holding the mouse above either field will display the tooltip with the cause of the problem. Set the sequence back to its original state and continue to the next step.
- Start measuring the sequence using the
 icon ⑦. The state of the ACTIVE sequence will change to WAITING FOR INJECTION. As soon as the Ready signal from the autosampler is detected, the measurement will start.
Note:
Even if the autosampler is not connected, Clarity will get the Ready signal, thus starting the sequence. However, it is not possible to generate separate demo data for each chromatogram, as all chromatograms would be the same. For the demonstration purposes, there are examples of the resulting files in the project folder. You may stop or abort the sequence now or later either from the Data Acquisition window or directly from the Sequence window. Close the Sequence window before proceeding.
- After the first row of the Sequence table (controlling one analysis) is measured, the Instrument will once again switch to the WAITING FOR INJECTION state, and the autosampler will start a new measurement by sending the Ready signal. Stop the sequence from the Data Acquisition window or Sequence window at any time by pressing the Stop
 button (single-click means that the currently measured Chromatogram will finish and the sequence will stop subsequently, after double-clicking, the sequence will stop immediately). All data measured will be saved. Instead of stopping, you can also abort the measurement with the Abort
  button (does not save any data nor produce any chromatogram).
 - Already measured rows will change their Status from green field () to icon with small chromatogram (
 ). During the measurement, the icon is orange. A small triangle will appear in the icon if a chromatograph is produced by the particular measurement in the row. Left mouse click on the triangle will reveal the option to open the chromatogram(s). You can click on the name of the chromatogram to open it or select option to open all chromatograms in overlay as seen in Fig "Opening chromatograms in overlay"
Note:
It is possible to edit the sequence even during the measurement. However, if it pauses due to an error, it is necessary to resume the measurement.
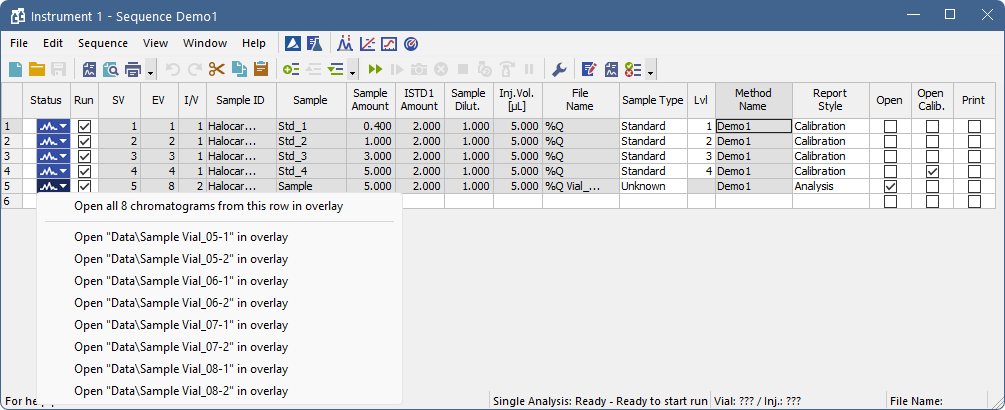
Opening chromatograms in overlay
- At each row on the right side of the Sequence Window, you can select whether the corresponding chromatogram will be opened, printed, or loaded into the calibration window.