Creating new calibration
Analysis Procedure: Step 1 -> Step 2 -> Step 3 -> Step 4 -> Step 5
- Use the Calibration
 button in the Instrument window to open the Calibration window.
 - Use the New Calibration
 icon ① to create a new calibration file. Save the calibration under a name of your choosing.
Note:
The calibration can be saved either using the Save Calibration  icon ②, File - Save, or File - Save As... command (no calibration can be saved under the name NONAME.CAL).
The Calibration window - loaded standard
- Use the Calibration Options
 icon ③ and change the Display Mode (top right corner of the dialog) to ISTD, then press the OK button.
Now, the calibration standards need to be imported into the calibration. This is done in a series of successive steps:
- Use the Open Standard
 icon (yellow) ④ to open the STD 1.PRM data file. The lower part of the Calibration window now displays the chromatogram of the calibration standard.
 - Use the Add All
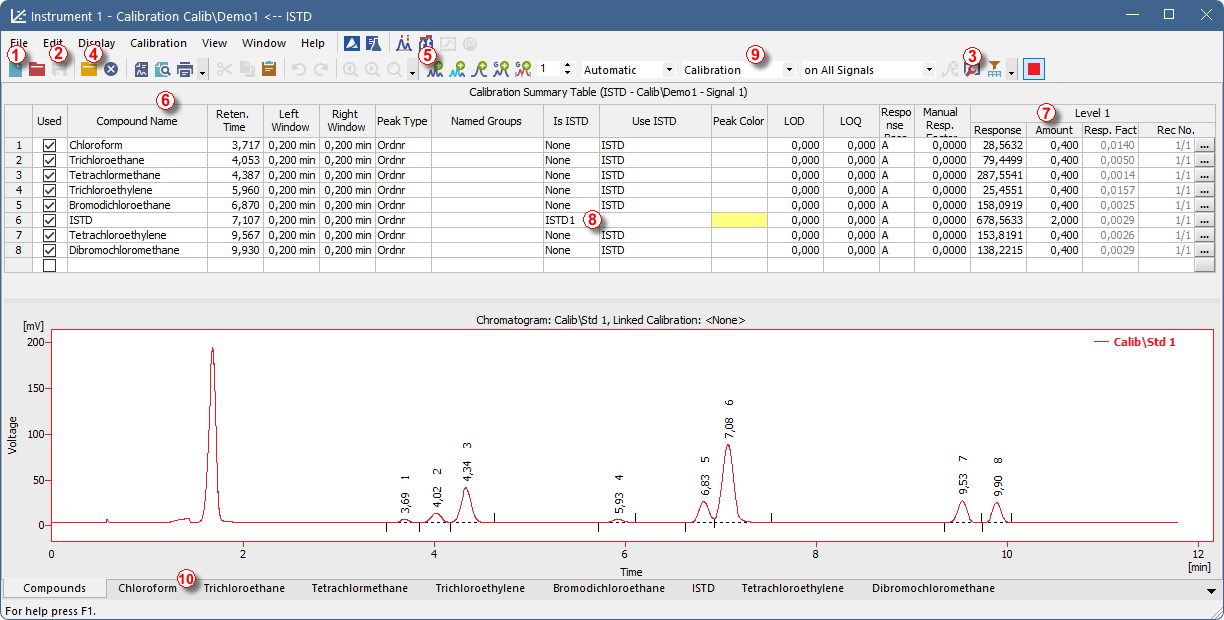
 icon (blue) ⑤ to move all identified peaks to the Calibration Summary Table. The Table appears in the Calibration window, ready to be completed as shown on Fig "The Calibration window - loaded standard"
 - As demonstrated in the Calibration Summary Table and the Chromatogram, individual peaks are now identified according to their retention times only. To label the peaks, click and edit the fields in the Compound Name column ⑥ to the names shown on Fig "The Calibration window - loaded standard"
- Fill the Amount column ⑦ with the concentration of the particular compounds. In this standard mixture, all compounds except for the peak number 6 (ISTD) have the amount of 0.4.
- Peak number 6 is marked as the ISTD peak. In the Is ISTD column change its type to ISTD1 ⑧ and then set its amount in the Amount column to 2.
The first calibration level is now established. On the tabs of the individual compounds ⑩ (labeled according to the Compound Name field), graphs with a single-point linear calibration can be viewed.
- Proceed to establishing the other calibration levels: the operation is quite simple and straightforward - use the Open Standard icon (yellow) ④ again to open another calibration standard named STD 2.PRM. Make sure that Calibration ⑨ is selected and use the Add All icon (blue) ⑤ (response will be added to first empty Level). Fill in the Amount column with 1.0 values (except for the ISTD peak 6, in which the value of 2 should be used again).
- Set the third calibration level analogously using the STD 3.PRM file and the Amount of 3.0, and subsequently the fourth level (file STD 4.PRM, Amount 5.0). Again, the ISTD peak should always have the Amount of 2. As the result, on the tabs of the individual compounds ⑩, the linear four-point calibration graphs can be viewed. Now, save the calibration file using the Save Calibration icon and choose the directory for saving the calibration.