Calibration window
Analysis Procedure: Step 1 -> Step 2 -> Step 3 -> Step 4 -> Step 5
The following section describes how to make a calibration. Calibration can be pre-filled automatically when using Standard Sample Type and filling Lvl field, but it can also be modified or fully created manually which is described below.
- Use the Calibration
 button in the Instrument window to open the Calibration window.
Note:
If you wish to skip the following section about creating a new calibration, you can open (via the File - Open... command) the calibration file DEMO1.CAL we prepared for you instead and test the functions of the Calibration window on it. In this case you can continue with the chapter "Linking the calibration to a chromatogram"
![]()
- It is necessary to create a new calibration. Use the New Calibration
 icon ① to create new calibration file. Save the calibration under Calibdemo for example.
Note:
To save the calibration now, it would be necessary to change its name (no calibration can be saved under the name NONAME.CAL) which can be done using File - Save As... command. Save Calibration  icon ② and File - Save command are enabled after first change to calibration has been made.
- Use the Calibration Options
 icon ③ and change the Display Mode (top right corner of the dialog) to ISTD, then press OK button.
 - Now, the calibration standards have to be imported to the calibration. Use the Open Standard
 icon (yellow) ④ to open the STD 1.PRM data file. The lower part of the Calibration window now displays the chromatogram of the calibration standard.
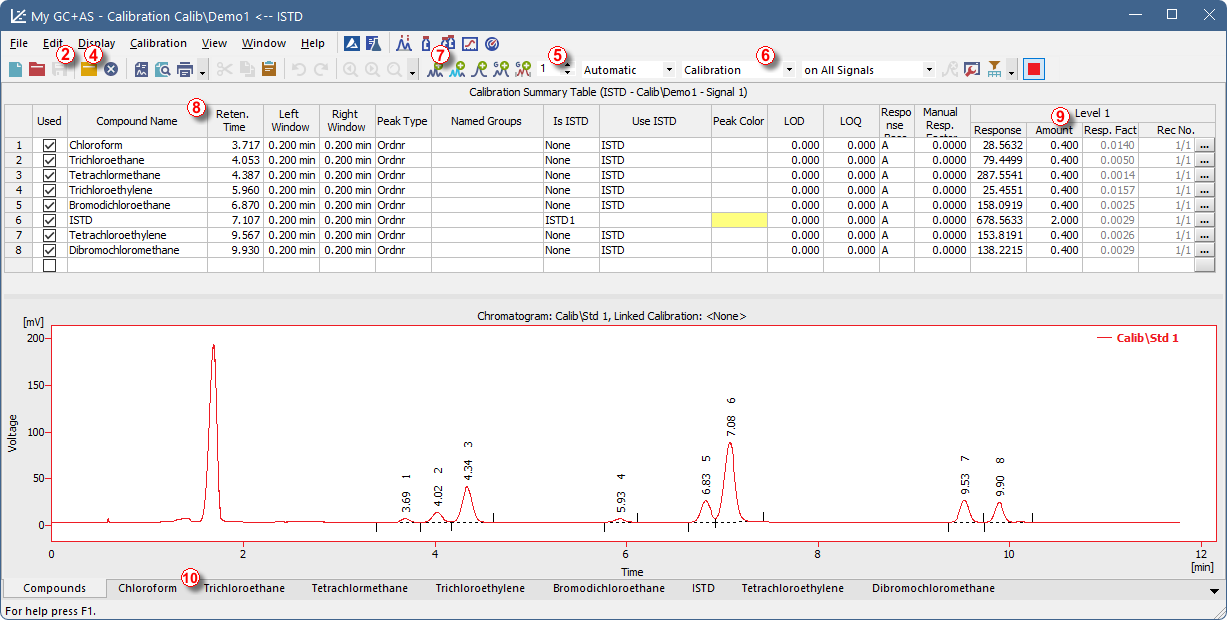
Calibration window - loaded standard
- It's recommended to check that the Current Level field ⑤ is set to 1, however, this is only for your orientation, because when Calibration option ⑥ is selected response is added to the first empty level regardless of which one is displayed. It is important to be on correct level when using Recalibration option. Use the Add All
 icon (blue) ⑦ to move all identified peaks to the calibration table. The Calibration table appears in the Calibration window, ready to be completed as seen on Fig "Calibration window - loaded standard"
 - As it can be clearly seen in the calibration, particular peaks are now identified according to their retention times only. Click and edit the fields in the Compound Name column ⑧ to those seen on Fig "Calibration window - loaded standard"
- Fill the Amount column ⑨ with the concentration of the particular compounds. In this standard mixture, all compounds except for the peak number 6 have concentration of 0.4.
- Peak number 6 is marked as an ISTD peak. In the Is ISTD column, change its type to ISTD1 and then set its amount in the Amount column to 2.
- The first calibration level is now set. On the tabs of the individual compounds ⑩ (named according to the Compound Name field) the graph with single-point linear calibration can be seen.
- Proceed to setting the other calibration levels. The operation is quite simple and straightforward - use the Open Standard icon (yellow) ④ again to open another calibration standard named STD 2.PRM. Use the Add All icon (blue) ⑦. Fill in the Amount column with 1.0 values (except for the ISTD peak, in which the 2 value should be used again).
- Set the third calibration level accordingly using the STD 3.PRM file and Amount of 3.0 and the fourth level (file STD 4.PRM, Amount 5.0) except for the ISTD peak (Amount 2 every time). On the tabs of the individual compounds ⑩, the linear four-point calibration can be seen. Save the calibration file now using the Save Calibration icon ② under the name CALIBDEMO.CAL into the default directory.